Nawaf Bahadur
Level Designer
Rules, Requirements, and Background

NEXT is a competition by Ubisoft Toronto that aims to simulate working on a project with them. As such, we were provided with some requirements and objectives:
-
Mission Design Doc. component requirements
-
We were allowed to make up characters for the story and to design the levels on the assumption of it being in the Far Cry series.
-
-
VIP specifications
-
We were asked to rescue mission for a kidnapped VIP character that was unable to use stairs and required the use of an elevator.
-
-
Required player objectives
-
Approach and gain access to the location from the surrounding area.
-
Locate the captured VIP at the location.
-
Escort the VIP to an Extraction Point.
-
Additional tasks (optional)
-
-
Icons and glossary + example
-
These were standardized actions that would be used to annotate our levels
-
DD
Pathing: Gamifying The Real World copied Oct 8
First of all I needed to examine the site. I used Earth View in Google Maps to view 3D models of Ontario Place. I needed that to get a general feel of the relationship of the buildings to their surroundings. I then looked in Far Cry 5's map and found a couple of spots I can plop in my level. One such spot is Elk Jaw Lodge is located. Look at the image A.


A
B
B1
B2
B3
And by tracing the buildings in image B, I could also have a good starting point in terms of the level structure. You can also see the triangular building at B1 being the CNE Ontario Government Building; B2 is where the wind turbine is, B3 is where the entrance to Ontario Places' Pods and Cinesphere are.
I had a couple of objectives when making the map:
-
Compress the play area to a 'walk-able' square area
-
Shift around structures to create interesting sight-lines and landmarks(more on that in the next section)
-
Maintain the feel of traversing the real location, especially the entrance bridge
-
Make the player feel small
I enjoy dissecting maps and that what I did here. I snipped bits and pieces from Google Maps and experimented with the arrangements of the buildings and spaces.
I moved the CNE Ontario Government Building and the wind turbine closer. then duplicated the turbine to fill in more space. It makes more sense to have wind farm of multiple turbines in Far Cry 5's rural setting than one niche turbine like in Toronto's urban setting.
Most of the islands on the east and west have been removed and streamlined. The buildings on the east island were too big and sparse and could be their own maps. A similar thing applied to the west island, but I kept the silos (the white circles on the left) from the water park and pushed it closer to the Pods(the diamond buildings at the center). My thinking is that the silos would create a lot of visual interest as an abandoned piece of infrastructure that would be located within the approach zone.
I also removed the docks at the south as they would get in the way of approaching the level from that direction.
After figuring out the basic layout, it became a little easier and intuitive to start imagining connections between the buildings. I added the red lines to make the pathways a bit more visible.

C


C
D
Then I sketched that into sticky notes to further explore the pathing. (as shown in images C and D.
With a general idea of the buildings and pathing set. I can finally move to bubble diagrams to further solidify the level layout. I sketched a general diagram. (Image E) and then a more fine grained one. (Image F) note that this is only looking at the general connections between the buildings and rooms, irrespective of the floors and grade variations.


E
F
I decided not to make an actual bubble diagram at this stage as it will become confusing and illegible very fast. I went to create the ground floor map and the exterior maps first.
Creating Maps with the power of PowerPoint
One thing many people don't know is that Microsoft's PowerPoint has a robust vector graphics engine that is perfect for quick vector sketches. I used it to make the diagram in Image F and also where I made the actual maps for the MDD. In Image G, you can see how I assembled the little pieces I made into the interior area of my map. This is my first step before I would start to work out how the exterior interfaces with the interior map layout. I started by drawing the exterior walls and exploring the spaces inside. (Image G) I wanted to try to use all the space inside the Pods in the hopes it will make people notice how the internal and external structures work together. You will notice at the bottom right Pod that their's an amphitheater-like room that had to be reoriented a couple of times while exploring the pathing. I also found out later that it was useful to have the seating directed the door as it helped people find their way. With the general room layouts set, I started exploring and moving around enemy paths and shifted around some room obstacles to provide cover and hidings spots. (Image H)
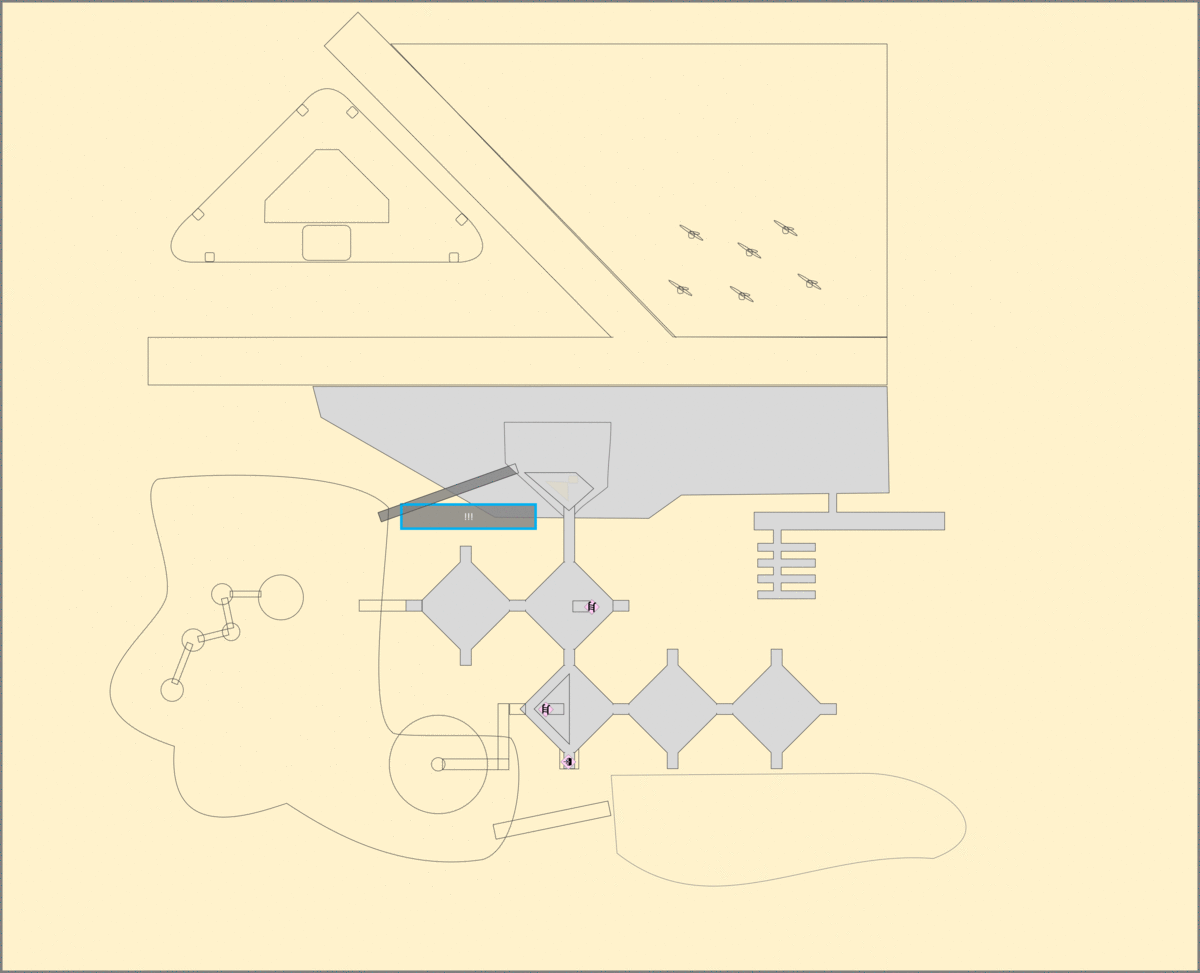

G
H
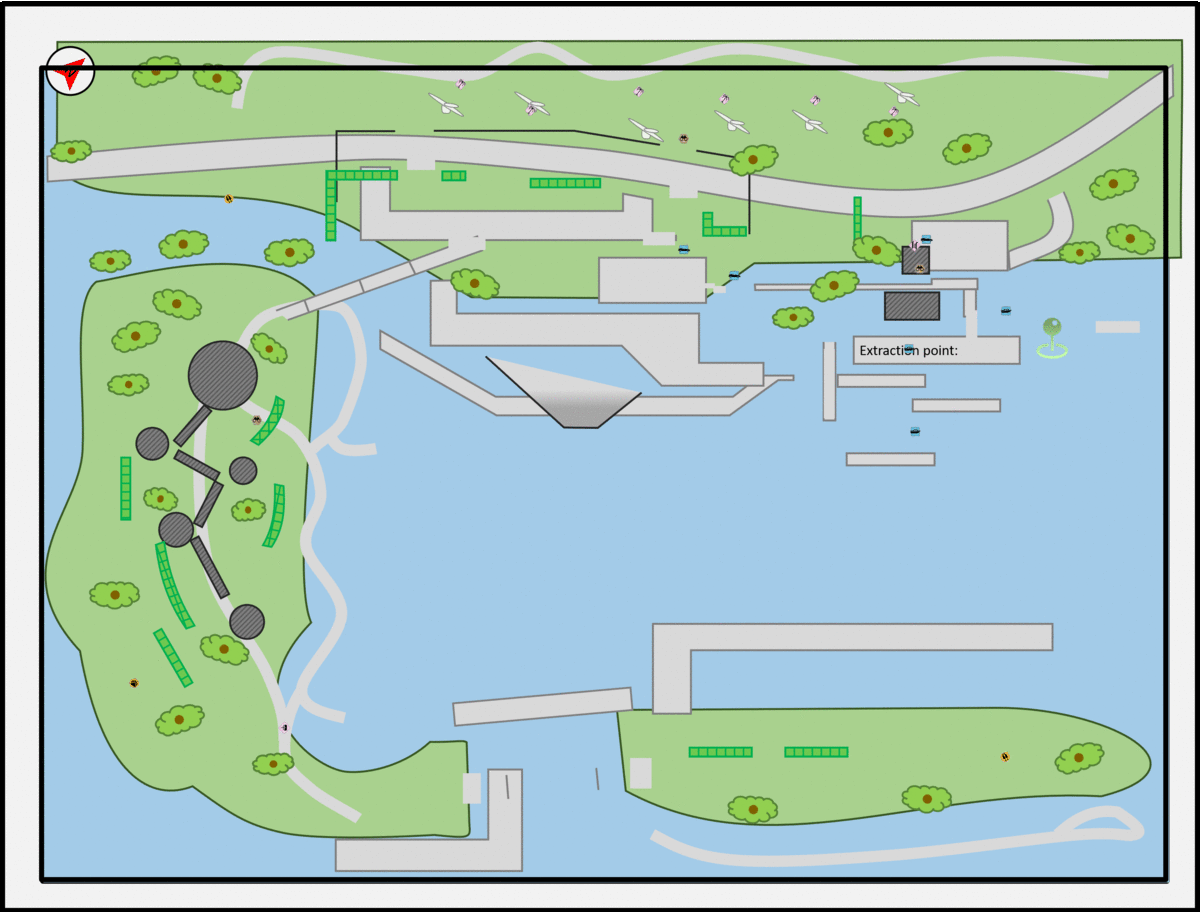
Around the same time, I also started thinking a the exterior portion of the map. At this point I have been using the traced version of the map (Images G & I) and still had the CNE Ontario Building (top left of Image G) and had the wind mills clustered at the north east of the map. The West Island was also a huge blob that I was not sure it needed to be that big (It's even bigger in real life. See image B). I cut out the CNE Ontario Building and spread out the wind mills into a more of a line like I have seen in photos online. (See Image 5 in the Reference section bellow).

I
J
Finally, I had all the ingredients I needed to make a map for the connections between floors. While it's possible to create this 'exploded view' map from just the diagrams, it didn't seem efficient use of time to produce it when it only needed to be shown in the MDD. So I created this last. (Image K) Note some of the rooms in Image I were changed after playtesting. More on that in the next section: Playtesting, Landmarking, and Narrative.

K
Ubisoft & the 360 Approach
Created my own Blueprints to facilitate the intended experience. Created my own Blueprints to facilitate the intended experience. Created my own Blueprints to facilitate the intended experience. Created my own Blueprints to facilitate the intended experience. Created my own Blueprints to facilitate the intended experience. Created my own Blueprints to facilitate the intended experience. Created my own Blueprints to facilitate the intended experience. Created my own Blueprints to facilitate the intended experience. Created my own Blueprints to facilitate the intended experience. Created my own Blueprints to facilitate the intended experience. Created my own Blueprints to facilitate the intended experience. Created my own Blueprints to facilitate the intended experience. Created my own Blueprints to facilitate the intended experience. Created my own Blueprints to facilitate the intended experience. Created my own Blueprints to facilitate the intended experience. Created my own Blueprints to facilitate the intended experience. Created my own Blueprints to facilitate the intended experience.